Although the Packster is *nearly* perfect for my needs, no bike is actually perfect. At least not without some upgrades. I still haven’t been able to address the shortcomings of the rear rack, which remains my one frustration with the bike. I still hope to eventually address that but in the meantime I’ve made some other changes to the bike.
I mentioned in 2 months with the Packster 80 that the seat had started slipping over time. Once it started that problem only got worse. No amount of tightening the bolt could prevent it. While heavier riders caused it to happen more quickly it would even happen with only me riding (and I’m only ~120 lbs). Taking a look at the clamp it seems obvious to me that the seat post/clamp chosen for the Packster (at least for the derailleur version, the NuVinci version comes with a suspension seat post with a different clamp) is a poor design for a cargo bike where the bike seat tends to get exposed to a lot more force than on a normal bike when you move the bike around. I do try to minimize how much I pull the bike around by the seat, and instead use the seat post itself for that, but it’s not always possible to avoid grabbing the seat. Because there are no ridges to increase the grip of the clamp and only one bolt the clamp is prone to slipping. And once the slipping starts it’s going to keep happening, and get worse. Joel at Splendid Cycles got the seat post replaced under warranty for me, with a new version of the same post. I have no doubt that the issue would eventually occur again though. In fact, in speaking with a representative from Riese and Müller it is apparently a “known issue” and the seat post was selected to meet a price point. I don’t fault them for needing to meet a price point, but I don’t think the bike needs to come with a fancy seat post, just one that’s capable of functioning as a seat post.


I’d been considering a suspension saddle or seat post for the Packster even before the slipping started. So it became a pretty obvious choice to upgrade the seat post once that problem presented itself. The folks at G&O had put a Body Float post on their demo Packster 80 and after giving it a try I was sold. So for my birthday I got a Body Float post for my bike. Although I don’t have much experience with other suspension posts to compare, I’m very impressed with the Body Float. It isn’t quite as good as the suspension on the Load, but it brings the Packster a lot closer to that feel. With such a long bike and the front wheel so far ahead of me I often struggle to pick a path that avoids the bumps. Or sometimes traffic just doesn’t allow me to avoid them. It’s not a big deal for the kids because of the front shock, but it was leaving my lower back somewhat worse for the wear. The Body Float has eliminated that issue. The effect is much smoother than I expected but the biggest surprise to me was that it really makes me feel more connected to the bike because I’m not getting bounced around as much. And as a rider on the short side I also appreciate that I can still have the seat fairly low while using the Body Float (much lower than with a ThudBuster LT, for example, though still high enough that you’re shorter than 5’3″ or so it may not work for you). And best of all, no issues with the seat slipping back!

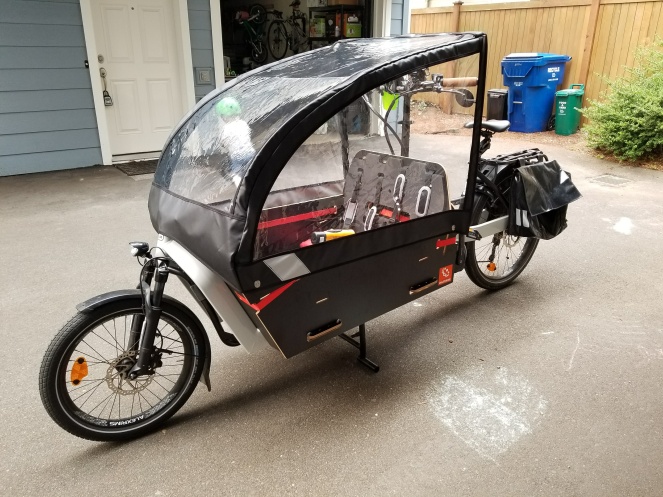
In addition to the seat post upgrade I also recently got the Blaq rain canopy installed on the bike and added some additional seating to the box. I’ll discuss the rain canopy later in it’s own post, once it actually starts raining again in Seattle. For now I’ll focus on the new seating setup.
I only have two kids, so having a bike with seating for two kids seemed completely reasonable at the time we got the bike. But as I’ve used the bike I’ve found that there are a lot of scenarios where it would be nice to be able to toss an extra kid or two in the box. On occasion for short trips I’ve gone ahead and done that by having H sit in the front of the box, since she’s old enough I’m not worried she’ll try to jump out. But I prefer the kids be harnessed and I’d rather than the smaller kids in front than the big ones. So I set out to create some kid seating in the front of the box. I wanted 5 point harnesses and a padded seat but also something that would be low profile, easy to remove and store, and that would give me more options for securing items in the front of the box when I’m not carrying extra kids. I initially considered just copying the attachment system of the stock R&M seats, but that wouldn’t really make it any easier to strap anything else in. And the slits would be fairly hard for me to cut into the box. After thinking about it I came up with the idea to use D-link anchors to attach the harnesses. They’ve got a large enough loop to allow a bungee to hook in for strapping down cargo and they fold very flat when not being used. I used the locations of the straps on the R&M seats as a template. And I selected stainless steel hardware as much as possible because this is Seattle and I’m expecting plenty of water exposure. I found generic highchair/stroller/etc. replacement harnesses on Amazon (though I don’t recommend this brand, the straps are too smooth and they slip and don’t hold the right length. **Edit** I got annoyed at the slipping and ordered another harness type that I like way better. This first type is getting returned. New ones are these.) and bought a piece of firm foam at the Friendly Foam Shop for the seat pad.

The biggest problem was avoiding the bike frame while drilling through the box. I was successful at that, although 2 of the bolts are a bit too close to the frame for me to attach the nut on the outside of the box, so I had to flip them and put the nut inside the box. I used some faux leather I had leftover from a previous project to make a cover for the foam. It won’t be completely waterproof, especially on the underside, but most things should wipe right off and it’s easy to remove if it does get too wet. The harnesses are easy to simply loop through the D-links to attach, but for easier on/off I may ultimately add clips so they can be popped off without the need to thread the strap through the buckle. I also added a chest strap to each harness (including the stock R&M harnesses) using elastic and plastic snaps that I had on hand. These prevent the shoulder straps from falling off a kid’s shoulder and give a little more support when the kids sleep. It’s a great hack for Yepp seats too!


So now I have seating for 4 kids on the bike! We haven’t tested it with a fully loaded box yet, but I did carry 3 kids for ~10 miles earlier this week. And even with two kids in the box we’re finding the extra seats a lot of fun. My kids enjoy riding facing me sometimes, they like having the option to ride facing each other, and little T especially seems to like the front seats because they’re a little more reclined and make it easier for him to snooze without flopping around. It wasn’t a ton of work and the total cost was ~$80. If you don’t already own snap pliers and have elastic and faux leather laying around it might run closer to $100 to do something similar. The most important thing was taking my time laying out the anchors where I needed them and making sure to avoid the frame of the bike. The only real downside I’ve encountered so far is that the anchors are a bit loud when I go over bumps if the seats aren’t in use. I’m thinking about coating them in Plastidip to see if that helps with the noise and if it holds up during use.


You should try Command Strips picture hangers for the seat pad. They’re velcro & we use them on our area rug so the dogs don’t slide them around.
LikeLike
Yeah, Velcro is definitely my fallback option and it’s what is on the seat pad for the stock seats. I’m hoping to find a solution that doesn’t require anything adhered to the bottom of the box for this one though. Which I think should work because it’s under less stress to slide around since the bottom of the box is angled and is lowest at that end. We shall see.
LikeLike
Thanks for sharing this, it’s awesome to create seatings for four kids this way. Definitely will keep that in mind if we decide to go for the packster 80, that way our neighbour kids could ride with us 😀
Have you ever ridden an Urban Arrow Family Bike and if what are your thoughts about it?
LikeLike
I haven’t had a chance yet. I tried a couple of times but one shop didn’t have one in stock for me to try and the other didn’t seem interested in taking it out of their window so I could try it. The closest dealer to me is in Portland and I haven’t traveled that way in over a year. Compared to the Packster I think the UA has a more upright riding position and is less focused on being able to climb well. As I understand it it now has the option for the CX motor and disc brakes, things that were lacking on earlier models and made it not very suitable for Seattle. From my perspective I liked the wider, lower, wooden box of the Packster over the strictly kid-focused thick foam box on the UA. It’s possible there are safety trade offs, but I’ve never seen anything that could quantify that and when the Packster has fallen over a few times my kids have always been totally fine, just slightly confused. I wish the UA website did a better job laying out the features and cost of the bike (same for Douze for that matter) the way the R&M site does for the Packster. It would make comparisons easier.
Ultimately though, I think the differences between the bikes mostly come down to personal preference and needs. The UA may be perfect for one rider or family and the Packster perfect for another. Hopefully sometime this summer I’ll get a chance to try an UA out so I can help point people in the right direction between the two based on what their needs are. Final decisions will always be best made by trying both out and factoring in things like the availability of a dealer to you. Even if I’d liked the UA as much as the Packster I ultimately decided the Packster would be a better choice for me because Seattle has a R&M dealer and doesn’t have an UA dealer. A year later, I stand by that part of the decision. The bike has been relatively problem free but a seemingly minor thing (the headlight not working) required replacement of the entire Bosch motor and it was good to have someone confident about working on my bike involved in that.
LikeLike
Thanks for your answer :D. I only have driven the Packster 60 and i loved it. Went offroad up hills into the woods to have a nice picnic on top with my little sun. So much fun and i felt safe for steering etc. Because of you, i would go for a Packster 80 now, i hope the steering feels similar. What i like about the Packsters is the front suspension, which is great on and offroad (which other models do not seem to have right now).
The alternatives now for a family friendly bikes seem to be the Urban Arrow Family and the Douze you mentioned. I will try to find a dealer and make a testdrive with both.
Happy Cycling in Seatte
LikeLike
What are the shortcomings of the rear rack?
LikeLike
It needs supports that come down further at the rear of the rack to allow use of really large/heavy panniers and make it easier to tow kid bikes (something it would really be nice to be able to do with this bike). The weight limit is only 20kg which is ridiculously low for a “heavy cargo bike” (R&Ms own label for the Packster 80). And R&M are against the rear rack being used to carry children in any capacity, something many owners would like to be able to do at least occasionally and that is possible with rear racks from other manufacturers like Urban Arrow. Especially given the price of the rack and that you cannot use any other rear racks with the bike I feel like these are fairly substantial shortcomings.
LikeLiked by 1 person
Oh, that sucks. Of course you want to put friends on the rear rack – the Packster 60 bucket clearly only has space for 2. It looks like you could attach a bowed child-seat, like the Hamax Caress to the seatpost though. Have you tried? Are there custom eyebolts or something that stop you using another rack?
LikeLike
There wasn’t enough space on the seat post for the ones I looked into, though it is possible that some will fit.
The entire rear end is very unique, so no after market rack will easily work. And it’s absurd to need one when the stock rack is incredibly robust.
LikeLiked by 1 person
> the stock rack is incredibly robust.
Oh, I don’t understand. Is the stock rack pretty strong but only specified to carry 20kg? Or does it really start to get problematic once you’re carrying weight?
The reason I ask is because, if I remember correctly, by law, racks in Erope that are rated to carry 22kg or more are considered legal to carry kids. The result of the law is that many cargo racks are specified to only carry 20kg so that they don’t have to deal with the liability of carrying kids. https://standards.cen.eu/dyn/www/f?p=204:110:0::::FSP_LANG_ID,FSP_PROJECT:25,12659&cs=1E738AAEBAF06EDFDE7CFA3BB76BE086D
LikeLike
… even though they’re plenty sturdy for carrying more
LikeLike
Yep, that’s exactly it. They don’t want to deal with it so they leave you with a rack that not technically rated to carry children, which I think is absurd for a cargo bike like this.
LikeLike
Well… now that we have it, I don’t think that rating is actually so wrong. With about 30kg of groceries on the back, things start to get quite wobbly. I wouldn’t trust that rack to hold a kid. That’s pretty disappointing, given it’s 3 times the price of a regular rack!
LikeLike
That sounds more likely to be a weight distribution issue. If you don’t have the front end weighted down well and you put anything on the rear beyond about 10kg it gets pretty wobbly. If the front is weighted well you won’t notice it even with quite a bit more weight on the rear. At least from my experience.
LikeLike